We’re going to quickly go through setting up a ListView, using the ViewHolder pattern, and handling clicks. Throughout this post, I’m going to be using screenshots of the actual code so that I can highlight lines of interest. If you prefer, you can download the source.
If you want to follow along, first download this zip file of fruit clipart we’ll be using. Then, start a new Android Studio project. When prompted, choose an “empty Activity” and finish the startup wizard. Then, copy of the PNGs from the zip file into your app/res/drawable directory. Now would be a good time to do a test build and run just to verify that you’re in a good starting position.
Layouts
First things first, we need to setup our layout. We’ll have a ListView above a TextView. The ListView will contain a list of selectable items and when the user selects an item by tapping on it, the TextView will show a short description.
Open res/layout/activity_main.xml. Android Studio should have created a TextView inside of a RelativeLayout. Put a ListView above it:
 The TextView needs to come first. Anchor it to the bottom of the screen with layout_alignParentBottom. Put in some default text and if you like, set the textAppearance to something larger than normal. Put the ListView above the TextView with layout_above. You’ll need to set an id for both the TextView and the ListView.
Next, we’ll need a layout for use with each row of the ListView. We want each row to start off with an image of the item, followed by a short text description. Create a new file named res/layout/listview_row.xml:
 Make sure to set the LinearLayout’s orientation to horizontal. Then add an ImageView and a TextView.
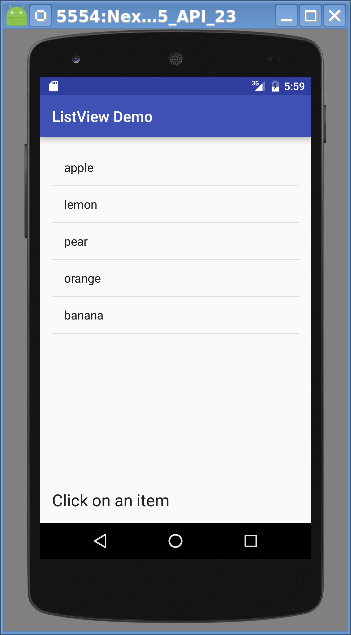
If you run the app at this point, you should only see the TextView at the bottom of the screen with the text “Click on an item”.
ArrayAdapter
Now, it’s time to write some code. A ListView is responsible for the rows and their scrolling, but the content of the rows is handled by an Adapter. We’ll eventually write our own adapter so that we have total control over the content, but first, we’ll use the ArrayAdapter class to quickly show the ListView in action. The ArrayAdapter takes an array of Objects and uses their toString()’s to create the rows of the array. Edit java/<packageName>/MainActivity.java:
 I get the listView, then create an array of Strings. I create the ArrayAdapter, passing it a layout that has a TextView in it (simple_list_item_1) and my array of Strings. Finally, I tell the ListView to use my Adapter.
If you run it at this point, you should see output like the following:
Our own adapter
The ArrayAdapter is great for quickly creating a working ListView, but we want far more control. To accomplish this, we could either extend the ArrayAdapter or just write our own. Writing an Adapter isn’t hard, so we’ll do that.
Our initial stab at creating an Adapter will attempt to replicate the functionality of the ArrayAdapter we already have. Create a new class, java/<packageName>/MyAdapter.java:
 Our class will extend BaseAdapter instead of Adapter. It doesn’t matter much which one we use in this example, but BaseAdapter implements a couple of abstract methods for us, so using it will mean less work for now. The constructor takes the Context and an ArrayList of the content for the rows.
The next three methods are abstract, so we are required to provide implementations for them. The getCount() method is used by ListView to determine the total number of rows. The getItem() method is used to return the element at a given position. The getItemId() method is used to return a unique key for each row. The idea behind getItemId() is that even if two rows are swapped, we can still identify which is which by using the Ids. So, generally, you will want this method to return a value based off of the row itself. But in this case, we’re not manipulating the rows, so we’ll just return the position instead.
The last method is the most important one, getView(). This is called each time the ListView needs to fill in a row. You are passed the position that’s being requested, a View to fill in, and the parent ViewGroup (the ListView, in this case). For now, we’ll use a super-simple implementation that inflates our XML layout for the row, gets the TextView from that row, and sets text to the correct item from the ArrayList.
In practice, because getView() is called so often, it is imperative that we do as little work as possible in this method. More on that in a minute.
Finally, we need to modify MainActivity.java to use our new class:
 Instead of a String array, we’ll now create an ArrayList. And the constructor for our new class no longer needs to be told which layout to use, so we’ll omit that from the constructor.
If you run the app now, you’ll see similar output to what we had before, except that the rows are a bit taller now that we’re using our XML layout.
Creating a bigger list for testing
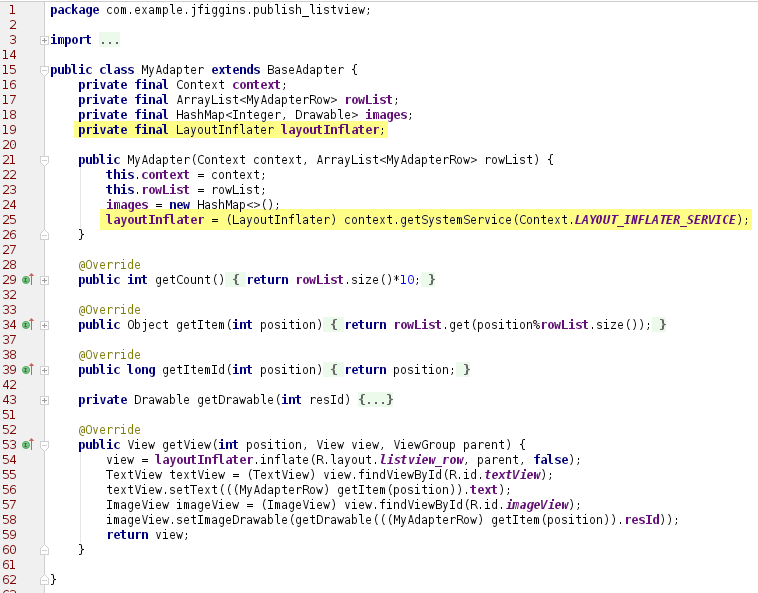
When working with ListViews, there are a lot of issues that will show up only if the ListView is particularly large. You can run into performance and memory issues easily. It will be helpful for us to use a data set that is much larger than the current five element one we’re using. Luckily, there’s an easy hack that can simulate a larger set. Edit MyAdapter.java:
 In getCount(), we mulitply the actual number of rows by 10. In getItem(), we add a modulus so that we never make an out-of-bounds request from the ArrayList. And in getView(), we change the setText() call to use getItem() method, instead of requesting the element from the ArrayList directly.
Adding images
We want our rows to have both the name of the fruit and an image of it. To accommodate this, we need to make the image data available to the adapter. As a first step, in MyAdapter.java, create a new class named MyAdapterRow:
 This is just a structure for storing both the text and the resource Id of the image.
Next, we’ll change MyAdapter to use the MyAdapterRow instead of Strings:
 Anywhere we referred to Strings, we now refer to MyAdapterRow. In getView(), we now populate the ImageView as well as the TextView.
Finally, we’ll change MainActivity to use the MyAdapterRow:
 String gets replaced with MyAdapterRow and each add() now creates a new MyAdapterRow with the resource Id and name of each fruit. The keen eye will notice that I didn’t have images for two of the previous fruits, so I’ve swapped them out for fruits I did have images for.
If you run the app now, you might get the following:

In actuality, you’re far more likely to get an OutOfMemoryError. Even if you don’t, if you try to scroll, you won’t be able to get very far before you see a crash. What’s going on is what I warned you about before: we’re doing far too much in getView() and we need to trim it down.
Optimizations
The first really expensive operation in getView() (and likely the one where you saw the crash) is in setting the image resource on the ImageView. By having this happen in getView(), it’s called over and over again as the user scrolls and garbage collection may not be called quickly enough to free the memory from the unused rows.
To fix this, we’ll load each image only once and store the resulting drawables in a HashMap. As future requests for these images come in, we’ll use previously loaded drawable instead of reloading it. Edit MyAdapter.java:
 The HashMap is added to the class and instantiated in the constructor. In getView(), setImageResource() is replaced with setImageDrawable(), and there’s a new method getDrawable(), that only tries to get the drawable if it hasn’t been done successfully before.
This change alone is probably sufficient to relieve the crashes, but the performance is still pretty rough. If you try and scroll up and down quickly, you’ll see what I mean.
One small tweak we can make is to not get a fresh LayoutInflater every time getView() is called:
 A LayoutInflater is kept at the class level and instantiated in the constructor. It’s no longer necessary to get it over and over again in getView().
ViewHolder pattern
The final optimization we’ll make is to add the ViewHolder pattern. As a user scrolls up and down in a ListView, Android must know about the layout for each row that’s visible. Inflating layouts is expensive and in the case of a ListView with more than a few rows, the impact of trying to constantly load and release each row can be significant.
To combat this, Android attempts to recycle rows as much as possible. When getView() is called, more often than not, the View it passes you will be from a previously used row. The more of the existing structure you can use, the better. This means that we want to avoid doing the layout inflation and the findViewById() calls.
ViewHolder accomplishes this by creating an object that holds references to the child views that we’re interested in and then storing them as part of View itself. If we get a recycled View, then we can reuse the children.
First, we’ll need to create the ViewHolder class. In MyAdapter.java, add a new class:
 Yup, that’s all there is to it.
Now, in getView(), we need to test to see if View is null or not. If it is, then we need to inflate the View and create the ViewHolder. Otherwise, we need to get the previously setup ViewHolder:
 The key to making this work are the getTag() and setTag() calls which allow a View to store an arbitrary reference to an Object. Exploiting this, we have our row store references to it’s TextView and ImageView. In a more complicated case, the ViewHolder might store dozens of references, making the performance improvement even larger.
Now when we get a recycled View, which is the most common case, we only make a couple of fairly lightweight calls.
Handling Clicks
Android makes it super easy to deal with input events, but for completeness, we’ll take a look at how to add some simple behavior when the user taps on a row. Edit MainActivity.java:
 We add an OnItemClickListener to the ListView and when a row is tapped, we use the position to look up the name of the item from the adapter and display that in the TextView below the ListView.
If you run the app now and tap on a row, you’ll see:

Conclusion
We saw how to setup and use a ListView, optimize it by using a ViewHolder, and how to handle taps. The full source can be downloaded here.