Introduction and use case
I have several personal programming projects that I work on in my spare time. They are all in Java, Kotlin, or Android (more Java and Kotlin). There are a few utility classes that I use in most projects, such as a logger class. Until now, when I would start a new project, I would copy the utility classes from a recent project and I didn’t worry too much about ensuring that every project had the latest version.
However, I want to move away from that model and toward one where every project always has the latest version of the libraries, where I’m not copying source around, and where I don’t have duplicated source in different projects.
Gradle supports the concept of modules, which allows you split large projects up into smaller pieces, each of which gets built independently. This would have worked okay for my needs, but it requires that you have the source for each module on disk (and since each library is going to become it’s own git repo), this would mean that I would have a lot of git management to deal with (updates means loading each module and doing a git pull, loading a project on a new computer means doing multiple git clones, etc).
What I really want is something like every other 3rd party dependency in my project. I want the ability to add something like this to my project:
dependencies {
    implementation group: 'com.jeremyfiggins', name: 'logger', version: '1.0.0'
}
and instantly have access to my logger class.
I host my own private GitLab instance and luckily, GitLib offers the ability to host a Maven repository (even in the free, open source Community Edition).
What to know before you start
Probably the biggest hiccup I encountered is that gitlab will let you retrieve your artifacts by group or by project, but it only lets you upload artifacts to a project. This was a problem for me because I wanted to create a group, separate from the source code, where I would upload the artifacts. This means that where I host the artifact is not intrinsically tied to the source that was used to build it. That’s what I wanted, because otherwise the consumer projects would have to add a repository block for each artifact they wanted to consume. Pay attention to the repository blocks in the gradle examples below; you’ll notice that the producer projects upload to a project, while the consumer projects download from a group.
Creating and uploading the artifact
First, in GitLab, you’ll need to create a group for your artifacts. When you create it, pay attention to the numerical group-id. You’ll need it when setting up the repository information in Gradle:

From the left-hand sidebar, you should have Settings > Package Registry. If that’s missing, then most likely you have an older version of GitLab. Upgrade and you should be good to go.
Then, you’ll need to setup a way to authenticate with GitLab. You can do this with a Personal Access token or a CI Job token (more details at https://docs.gitlab.com/ee/user/packages/maven_repository/#authenticate-to-the-package-registry-with-gradle), but I chose a Deploy token. The Deploy token can be set to only allow reading or writing, which is a nice option if you want to develop the artifacts on one system and consume them from others. In my case though, I want develop and consume the artifacts on the same system, so I created a token with both read and write privileges.
Go to Settings > Repository to create the Deploy token. Once you have the token created, open ~/.gradle/gradle.properties (or create it if it doesn’t exist), and add this line:
gitLabDeployToken=<your deploy token>(This is just one option for where to stick the token and Gradle offers several. If you have a different preferred option, go for it.)
Next, you’ll need a project for your artifact. You can do one project for all of your artifacts or one project per artifact. It’s your choice, but I chose one project for all of them. Like when creating the group, make sure to record the numerical project-id.
Now, in IntelliJ, create a new Gradle project. Make sure to pay attention to the artifact coordinates, as this is how you’ll refer to this artifact as a dependency in other projects. You can change it later, but it’s easier to get it right now:
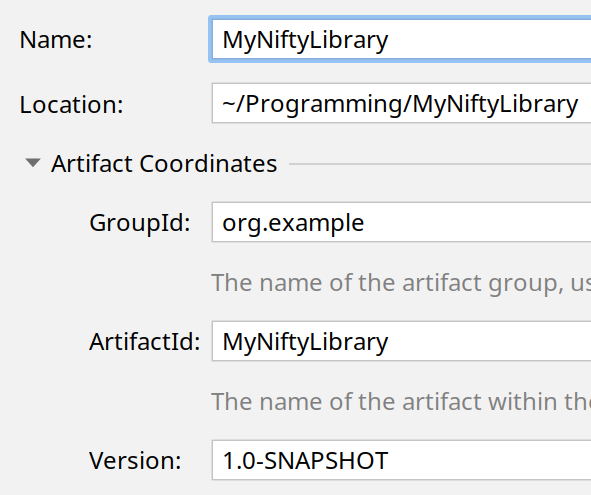
Also, Gradle is currently in the middle of a transition from using Groovy to Kotlin as its DSL language. For new projects, I’m choosing to use Kotlin.
At this point, you can create your library classes. For my logger, it’s a single, Kotlin object.
Then, you’ll need to add the pieces to your build.gradle (or build.gradle.kts in these examples) to enable the publishing of the artifact. If you’re using Groovy as your DSL language, the official GitLab documentation at https://docs.gitlab.com/ee/user/packages/maven_repository/#publish-by-using-gradle still uses it.
First, add an import for the publishing extension to the top of the file:
import org.gradle.api.publish.PublishingExtensionThen, in the plugins section, add:
publish {
    `maven-publish`
}
(Note those are back-tics.)
Finally, anywhere in the Gradle file, add this new section:
configure<PublishingExtension> {
    publications {
        create<MavenPublication>("maven") {
            from(components["java"])
        }
    }
    repositories {
        maven {
            url = uri("https://<host>:<port>/api/v4/projects/<project-id>/packages/maven")
            name = "GitLab"
            credentials(HttpHeaderCredentials::class) {
                name = "Deploy-Token"
                val gitLabDeployToken: String by project
                value = gitLabDeployToken
            }
            authentication {
                create<HttpHeaderAuthentication>("header")
            }
        }
    }
}
replacing, <host>, <port>, and <project-id> with your real values (and remembering that project-id is the numerical ID, not the name).
Finally, do a “gradle publish”. If everything was successful, then in GitLab, if you open your project, then go to Packages & Registries > Package Registry, you should see the artifact you just created.
Remember, each time you do a publish, you need to bump the version number. If you don’t, the consumer projects won’t be able to tell that the artifact has been updated and they won’t get the latest changes.
Consuming the artifact
In the project that’s going to consume the artifact, first you’ll need to add a reference to your GitLab Maven repository in your build.gradle. Unlike the previous example, my existing projects are using Groovy for the Gradle DSL, so these example are Groovy-based (use the above example as a template for what the Kotlin version should look like).
Add the following to your repositories section:
repositories {
    maven {
        url "https://<host>:<ip>/api/v4/groups/<group-id>/-/packages/maven"
        name "GitLab"
        credentials(HttpHeaderCredentials) {
            name = 'Deploy-Token'
            value = project.gitLabDeployToken
        }
        authentication {
            header(HttpHeaderAuthentication)
        }
    }
}
Replacing the <host>, <port>, and <group-id> with your values.
Then, in the dependencies section, add a reference to your artifact:
dependencies {
    implementation group: 'com.example', name: 'myniftylibrary', version: '1.0-SNAPSHOT'
}
where the group, name, and version match the values of your artifact. At this point, you should be able to refer to the utility classes in your artifact in this project.
Something’s not working!
At first, my library was only accessible from Kotlin source, not Java. Then, all of a sudden, it wasn’t available in Kotlin nor Java. If you’re experiencing the same thing, then it’s likely an issue with a stale cache.
I did clear the gradle cache by deleting ~/.gradle/caches, but I don’t think that was necessary. I also did a “gradle cleanBuildCache”, but again, that probably wasn’t necessary.
What did fix it for me was clearing the cache in IntelliJ. Go to File > Invalidate Caches and restart IntelliJ if you’re experiencing any problems.